Forge Construction Log
So I'm finally doing something I've been wanting to do for some time: build a forge. I like learning new skills, and blacksmithing (with a longer term goal of bladesmithing) has been taunting me for some time. I'm also rather curious to find out just how much blacksmithing one can get away with in suburban Seattle.
I'm pretty closely following the (now) standard Reil Miniforge design, as given on his site and in the book Gas Burners for Forges, Furnaces & Kilns. Both of those sources offer far more technical detail than I'm going to get into here. They're also written by people with far more experience and competance than I.
While there is quite a bit of information available on the web about building a forge like this, it's spread out and often poorly organized. It also tends to gloss over details that can be very frustrating to puzzle through. I thought I'd let people see how I muddled through it, hopefully filling in some of those holes. This format might also give a reasonable sense of how much actual work is involved. I've seen some sites that claim this is a weekend project. And if you knew exactly what you were doing, had all of the parts on hand, and didn't do much else that weekend, it very well could be. For the rest of us, while the toal amount of work isn't prohibitive, it will likely stretch on several weeks. Or months.
Note: All of the pics here are part of this collection. If you're looking for a different angle or something, you might be able to find it there. Failing that, mail me! If you're not a bot, I'm sure you can figure out my address.
Aug 11, 2004 -- My copy of Gas Burners for Forges, Furnaces & Kilns arrived today. Started planning.
Aug 14, 2004 -- Bought parts and the propane tank for the forge shell. It starts now.
Aug 17, 2004 -- Bought kaowool, kiln shelf, Rigidizer and ITC-100 at Seattle Pottery Supply. Good place -- Seattle is truly blessed when it comes to retail supply houses.
Aug 30, 2004 -- Okay, it really start now. First step is to fill the propane tank with water, so I can safely drill/cut/grind into it. I bought a brand new tank, but best to be safe. If you're working on a used tank, this step is absolutely critical.
I tried to fill it by submerging it in the bathtub, but I couldn't get any water to actually go into the tank. I also found holding the inner spring lock on the propane tank open with a screwdriver to be quite tiring and awkward. Hrm.
Aug 31, 2004 -- Bought a cheap propane regulator from the hardware store. I cut off the regulator, leaving just the screw on tank adapter. (That connector type is called POL, btw.) By screwing it on to the tank, I no longer have to constantly depress the spring valve in order to have a hope of getting water to flow into it. (You're going to need to buy a real POL adapter anyway for the burner plumbing later. Safe yourself the money and buy it early, so you can use it here.)
Decided that the best way to fill the tank was to submerge it in enough depth that the pressure will force the water in. Filled a garbage can with water and submerged it. Getting it to stay down took a lot of rocks and carefully balanced lumber. I thought I heard some water tinkling in. Will leave it overnight to see what happens.
Sep 1, 2004 -- After 24 hours, the tank is maybe 20% full. I filled the garbage can higher and left it again.
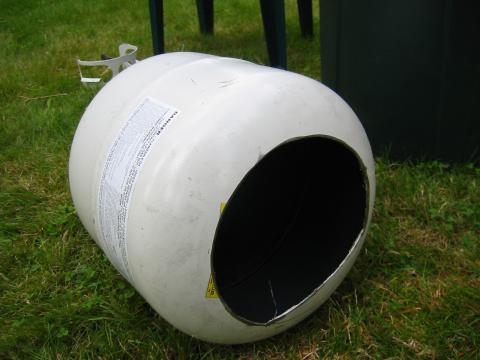
Sep 2, 2004 -- The tank is maybe 40% full now. I decided that this was enough if I tipped it on its side before cutting into it, so that water would be covering the area I was working on.
The goal at this step is to cut away all of the stuff attached to the tank, but leave a way to mark a concentric circle on the end of the tank. One way to do this is to unscrew the existing valve and replace it with a pipe cap.
With the tank laying sideways, I first removed the protective carry ring by grinding through the welds. No explosions, yay! Now that the ring wasn't in the way I tried to unscrew the valve -- no go. I tried grinding away some of the valve to give the wrench better grip. Still couldn't remove it, but the grinding opened up much larger holes. I resumberged it and it filled in about 20 minutes. After it was full, I decided to give up on unscrewing the thing so I ground the valve all the way off flush with the tank. I was thinking I might be able to drill it out some, and then use a large screw extractor. However, the valve neck turns out to have a couple holes through it, with the main one running right up the center. So I tapped it, screwed in some allthread (readyrod) and ground it off flush with the valve stump. Marked the center and centerpunched it. Perfect. From that platform I marked a 8 inch circle. Done.
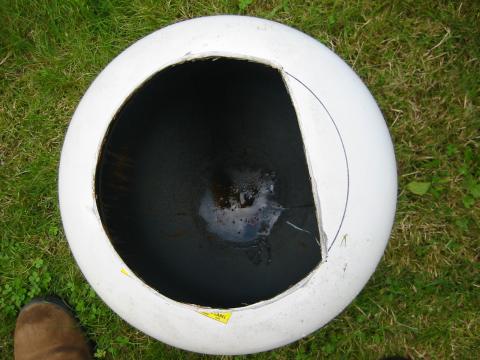
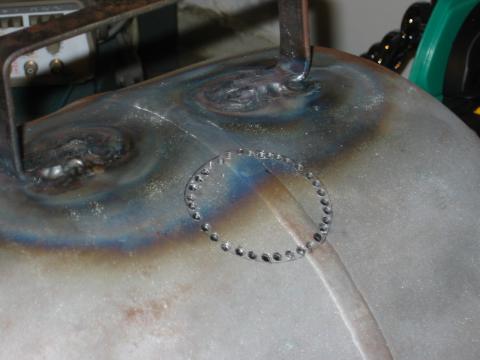
Sep 3, 2004 -- First I mark the chord in the circle which will become the kiln shelf support. You might want to try lining this up with all the weld scars left by the carry collar and the lower ring (which we haven't removed yet). Given that these weld marks don't even line up with each other, it probably isn't possible. But I wish I had tried a bit harder.
I used the angle grinder with a cutoff disk to cut out the first opening. By working my way around the path several times, cutting deeper each pass, I ended up with a moderately clean cut. Much easier than I expected.
Sep 4, 2004 -- Today's goal is much like yesterday's: cut out an opening. Unfortunately, there isn't a convenient way to center a compass on the bottom of the tank. There is, however, the ring it sits on. This needs to be ground off, but first I notice that it happens to be exactly the same diameter as my forward opening. Had I been smart, I would have planned it to end up this way. I trace out the circle with a Sharpie, and grind it off. Now that the tank isn't filled with water, this is an even more annoyingly loud operation. Hearing protection is strongly advised.
Now I have a forward opening, with the kiln shelf chord, and a circle marked on the rear which should line up with the forward one. The tricky part now is to mark a chord on the rear which lines up with the one on the front. I did it by bracing the tank on my workbench, measuring the height to each side of the chord, and duplicating it on the rear. This didn't work particularly well, so I cut the chord on the rear a bit high. I can grind it down to be level later.
Also, happy birthday to me!
Sep 7, 2004 -- Eventually I'm going to need to remove the paint. Today I tried burning the paint off with a propane torch -- it smoked a lot and was very slow. Decided to sandblast using sandblaster I have access to.
Sep 13, 2004 -- I need to cut the kiln shelf down to size. Looked into renting a proper masonry cutter, but getting one big enough to cut a 16 inch length would be both very expensive and a huge pain to transport. So instead I bought a $10 4-inch diamond masonry blade and cut the shelf using the all-powerful angle grinder by hand. This worked pretty well, but the lower side of the cut tended to break out in a very unpleasing way. I think this could be improved if you were willing to sacrifice a section of kiln shelf and cut on top of it.
Sep 15, 2004 -- Took the tank into the shop and sandblasted it. (Later I found out that the paint would scrape off pretty well with a putty knife. In case you don't have access to a huge industrial sandblaster, you might want to try this instead.)

Sep 18, 2004 -- Ground the kiln shelf supports to be even and true. I need to make a better jig for holding the shell level.
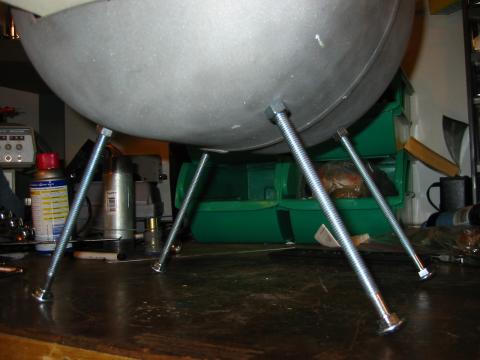
Sep 19, 2004 -- Thought a long time about how to lay out the handle and leg placement. Eventually decided to get a decent laser level and make a good leveling jig for the tank. By lining up the centerline of the jig with the vertical plane of the laser level, I figured I could mark the centerline on the top of the tank. It worked okay, but it took more fiddling than I would have liked. The tank is really quite bumpy, so even with the jig it was hard to duplicate results. The results look good, at least.
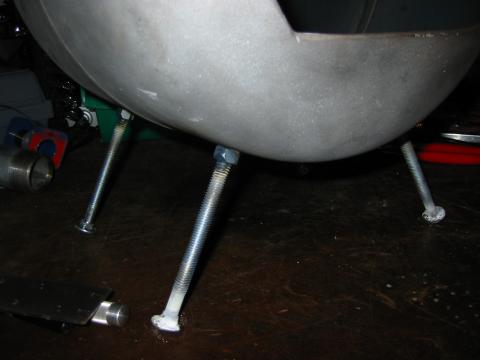
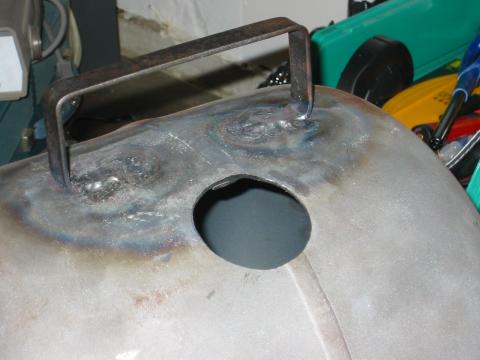
On a roll, I went ahead and drilled the leg holes and temporarily attached the legs. I decided to leave the bolt heads down, to act as feet. They are held in place with nuts on both sides of the shell. These will have to be welded so they can't come lose.
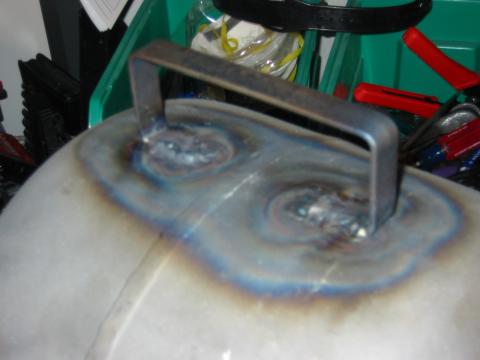
Sep 20, 2004 -- Made the handle via some brute-force coldworking. Stuck a 1/8 inch by 3/4 inch steel bar in a vice and banged away with a hammer. Very satisfying. I'm looking forward to using the finished forge. Welded it on using a ridiculous clamping system. My welding sucks.
Sep 21, 2004 -- Cut down the legs to be more stable, about 5 inches long now. Carefully adjusted them until the forge was level and it didn't rock any on a flat surface. Welded the nuts to the bolts, but not to the shell. This way the legs will be solidly attached and be easy to cleanly grind off should I need to in the future.
Sep 22, 2004 -- I've been putting it off, it being the part of this I'm least comfortable with, but I started looking seriously into burner options. Talked to a friend who had down some similar stuff, decided that a Reil EZ Burner would work. Not as efficient as some, but much easier to make.
Sep 23, 2004 -- Bought burner parts. Having trouble finding the 1-1/2 to 3/4 inch reducer.
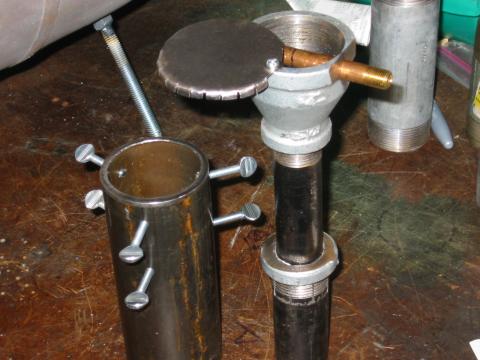
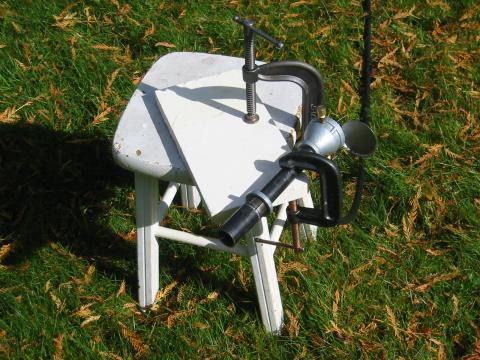
Sep 24, 2004 -- Found a source for the reducer: Hardwick's! Best hardware store in Seattle, source of all kinds of unlikely products. Also got a numbered drillbit set and pin-vice for the aperture. Cut the burner tubes to length, sliced the nozzle tube and tightening ring. Ground down the reducer to make it easy to drill.
The tightening ring system looked easier and spiffier than setscrews, but I really don't think it was worthwhile. Drilling and tapping setscrews isn't that hard, and I ended up being completely obsessive over the sawing of the thread blades. (I do have to say I think it came out look pretty darned spif.)
Sep 25, 2004 -- Realized I should use a Y drill for the aperture mount, so I bought a lettered drillbit set. (As good of an excuse as any to complete my drillbit set!) Drilled the mount, and drilled and tapped the setscrew. I did try the idea of using a small section of 1-1/2 inch thread to hold the aperture tube in place. It worked fine, I just thought it looked rather ugly. It would also make installing a choke a lot harder than what I ended up doing.
Sep 27, 2004 -- Lots of sites mention that once you turn a forge off, the burner tube becomes a chimney for all the superhot air inside. With the rather delicate brass cross tube in the EZ Burner design, I decided I didn't want to take a chance. I needed a way to block off the flow of air once I killed the burner, preferably something very easy to engage. I decided on a sheet metal choke plate, with the top half curved over to hold it in place. It was pretty easy to make, I just cut it out with some tinsnips and then hammered the tabs down. I lacked the 6-32 bottom tap needed to attach it properly, so that will have to wait.
Sep 28, 2004 -- Got the 6-32 bottom tap (at Hardwick's!) and finished the choke.
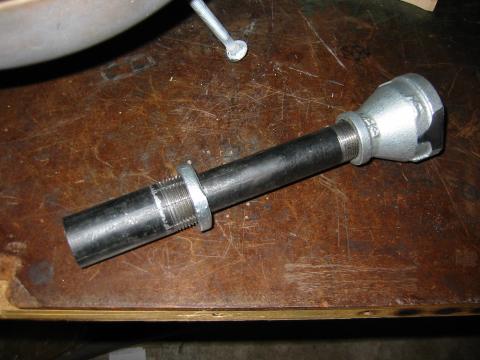
Sep 30, 2004 -- Spent some time looking for a pipe to mount the burner in. It needs to be 2 inch diameter in order to clear the tightening ring. I found plenty of galvanized pipe of that size, but I don't want to deal with the zinc oxide outgassing issues. (Galvanization is a sacrificial layer of zinc. When heated, it will burn off and poison you. Also called 'fume fever'.) Finally found a source for 2 inch black iron pipe at Aurora Plumbing. Cut it to length, drilled and tapped the thumbscrew holes. I decided to go for two rows of thumbscrews. It isn't really much more work, and the added security makes me happy.
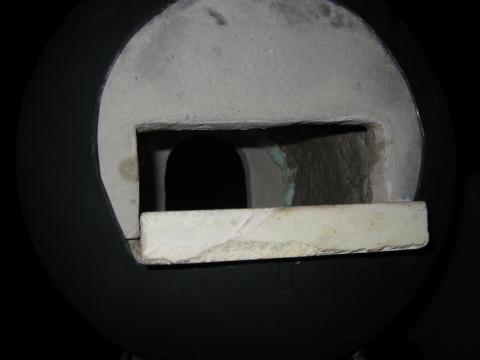
Oct 1, 2004 -- Cut out the hole for the burner mount tube. The positioning doesn't seem to be very critical, as long as it is fairly steep. I mostly just made sure it didn't interfere with normal handle usage. First I drilled a sequence of holes around the circle.
Next I widened them into each other as much as possible with a horribly abused saber bit. Then I threaded a hacksaw blade through the wider holes and sawed through the remaining sections. Eventually enough were cut so I could hammer it out forcibly.

I then spent a lot of time filing it out to fit the burner mount tube.
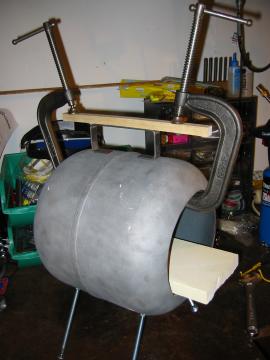
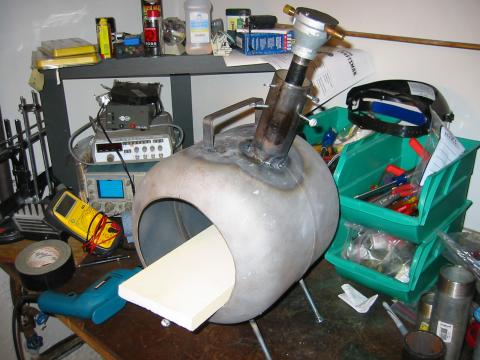
Oct 2, 2004 -- Welded the burner mount tube on. I first aimed it by clamping a dowel in place of the burner. This both made sure it was pointing at the center of the kiln shelf as well as helped hold it in place. My welding still sucks.
Finally ordered the propane piping from flameengineering.com. Was glad to find that site. So many other supply places had an odd mismatch of connector sizes. This made me a lot more confident that I wasn't wasting a not-inconsiderable amount of money on the order.
Oct 8, 2004 -- Propane parts arrived! After watching the second presidential debate, assembled most of them, using yellow LPG rated pipe tape.
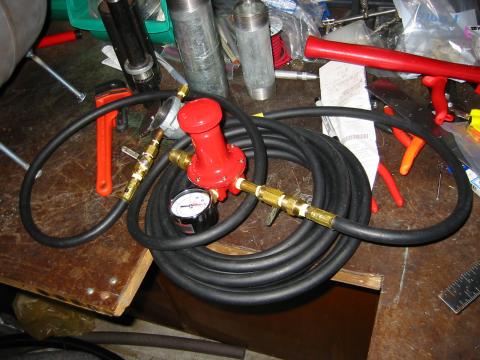
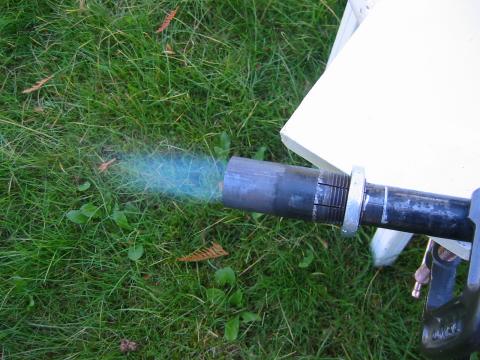
Oct 10, 2004 -- Finished burner assembly. Tested for leaks with soapy water. No leaks! Tested the burner. Couldn't get a stable flame until the choke was half shut. Let it cool down, then drilled out the aperture to #58. Tried it again. Wouldn't start until the choke was half closed, but once it warmed up it was completely stable with the choke wide open.
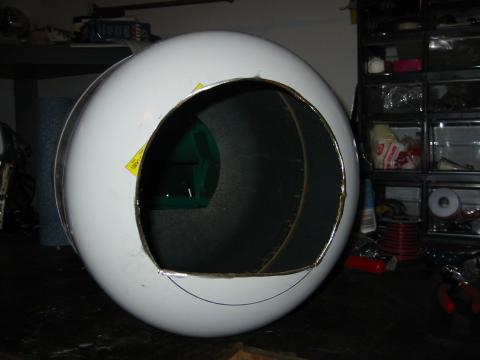
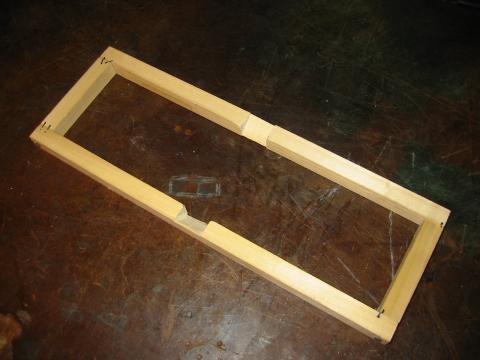
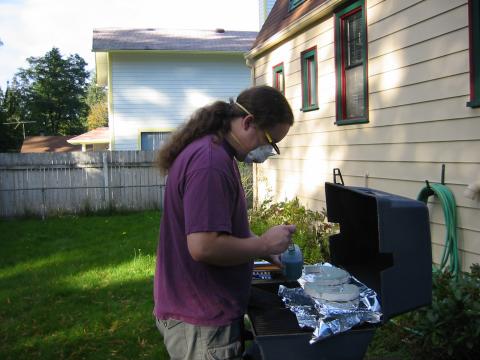
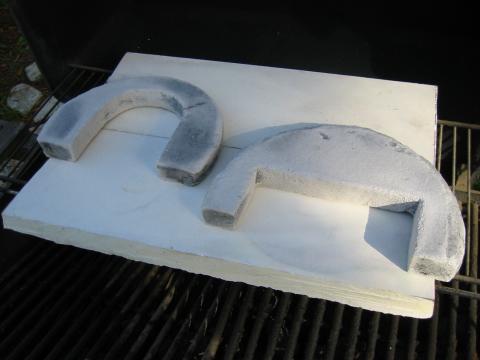
Cut the enclosures out of the fiberboard. Nasty stuff, and annoyingly delicate. Like a crumbly sponge that presents an inhalation hazard! Cuts pretty well using a hacksaw blade, just be careful to pull well back on the up stroke, otherwise the dust pulled up with the blade will mar the surface. Used up a pint of rigidizer on the two enclosures. At first I planned to fire them immediately (hence the BBQ), but later decided not to because of the risk of warping or spalling. I'll just wait a few days to let them dry.
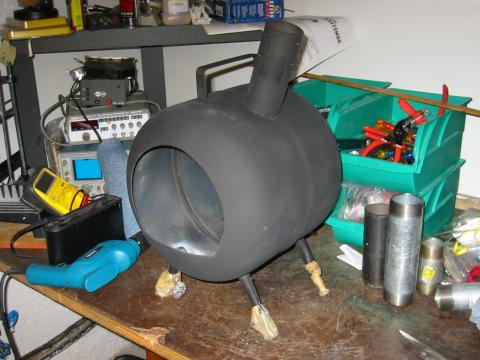
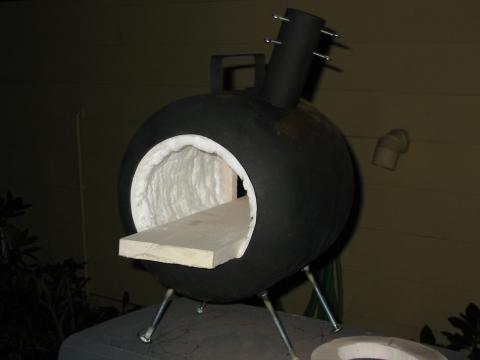
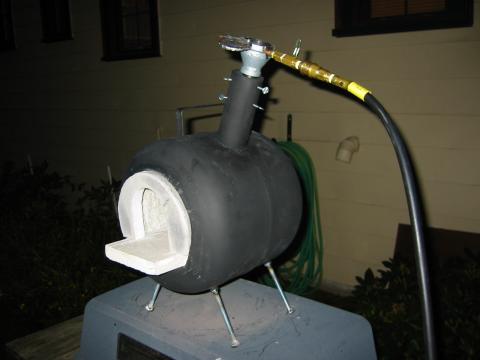
Applied the first coat of hightemp paint to the shell. Starting to undeniably look like a forge!
Oct 11, 2004 -- Second coat of paint. After a day, the fiberboard enclosures are still quite damp. I'm going to try standing them up in front of a fan overnight.
Oct 12, 2004 -- The enclosures are almost dry, after only 8 hours! This definitely seems like the way to go.
Later in the day I decided to try firing them. First they turned black, as the impurities burned. Then they turned white, as the impurities burned away. Both now feel a lot like fire brick, or pumice: hard, vaguely ceramic, and very light.
It was nice to test using the burner as a handheld torch. It worked just fine, though a better way to hold it would be nice. I'm afraid to put any torque on the aperture tube, for fear of it twisting free of the setscrew. But without a shield of some kind, I generally would like to hold it as far away from the nozzle as possible. The burner itself doesn't get hot, but there is plenty of radiant heat.
Extra bonus: I was able to get a sense of the heat distribution in the flame. The hottest part seems to be an envelope around the visible flame, maybe half again as big, coming out from the nozzle at a surprisingly steep angle.
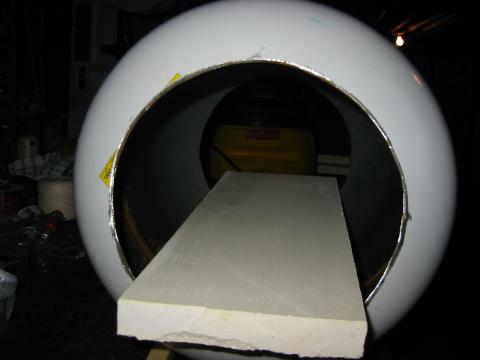
Oct 17, 2004 -- Applied ITC-100 to the enclosures and the kiln shelf. I cut it 50% with water, which seemed to be a really good idea. The moisture in it is sucked out almost immediately, leaving you with unspreadable grit. After the rain stopped I tried heat curing the ITC-100. It worked on the enclosures, turning the ITC a very light grey, but I just couldn't get the kiln shelf hot enough. Too much thermal mass. It will have to cure in the forge, which isn't a problem. I was mostly concerned about the (removable) front enclosure bonding to the kaowool if it wasn't cured yet.
Tired of putting it off the kaowool installation, I decided I might as well go for it. It wasn't nearly as unpleasant to work with as a feared. The fiberboard was much worse. It acts pretty much like very dense cotton candy. Cuts well enough with a razor blade, but it dulls them quickly. Have extra blades on hand. Getting it into place wasn't too much trouble. I had to cut away some in order to get the rear enclosure in place, but it looks pretty good. The front is a bit messier, as my razor blade was getting fairly dull at that point.
Even though it was getting dark, I didn't want all that unbonded kaowool sitting in the forge for the next few days in my poorly ventilated workspace. So I went ahead and applied the Rigidizer and the ITC-100. Somewhere I saw a suggestion that it is best to spray them onto kaowool, so I aimed to try this. Unfortunately, as I found with the Rigidizer, using even a little spray bottle on the inside of a forge this small just doesn't work very well. It just doesn't fit, and when it does you're severly limited in angles by the gravity feed of the sprayer. (My forge experienced ullage problems! Whee, I don't get many chances to use that word.) I ended up setting the spray bottle to squirt instead of mist, and aiming down at an angle with the bottle completely outside the shell. This worked decently, but I don't think it saved much effort. Given how lumpy ITC-100 is, I didn't even try to spray it. I just dabbed it on with a broken-off stub of a paintbrush. Slow and messy, but it worked. Better lighting would have helped, and I think you could install the rear enclosure last. You would probably want to leave an inch or two free of ITC-100 until it was permanently mounted. It dries fairly quickly. This would give you a lot more access to the inside of the shell. Just be sure to test fit it first.
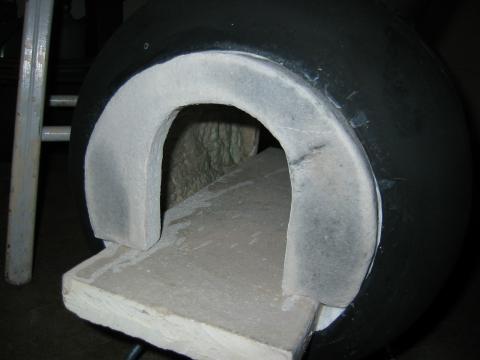
From the rear view you can see where I left an area untreated near the front enclosure. This is to allow flex while the enclosure works into its final position. I'll eventually treat this strip (and the equivelent one around the burner port) later.
I brought it inside and set it up in front of the fan. I'm spending tomorrow and the next day doing last minute work for this year's space robot proposal, so it will have plenty of time to get nice and dry. Soon, very soon, I'll be able to light it up and see if I've wasted the last two months of effort.
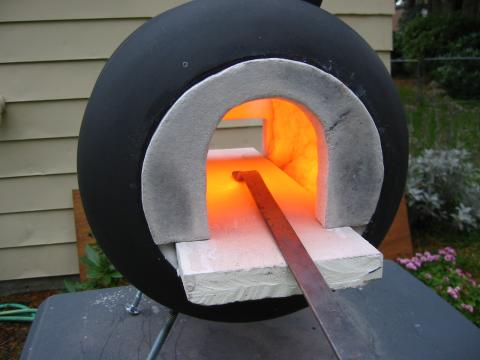
Oct 21, 2004 -- First firing!

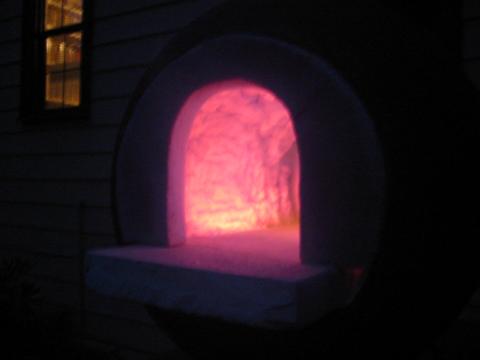
No real problems getting it lit. Let it go for 5 minutes and shut it down, following the curing directions in Gas Burners for Forges, Furnaces & Kilns. Very pretty.
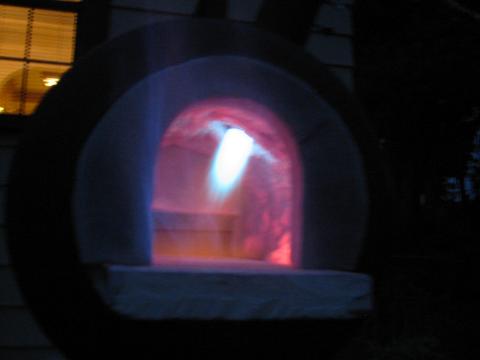
The propane isn't burning completely, even with the choke wide open, at a wide range of pressures. Not sure why this is yet. I forgot to pack the burner mount with kaowool scraps, so it's possible that is screwing up the venturi draw. If that doesn't fix it, maybe I'll try a smaller apperture.
Oct 22, 2004 -- Second firing. Still had the external flames, even with the packed burner mount. It got worse as the forge warmed up. Could the O2 depleted exhaust be getting sucked back into the burner? I'm in Spokane this weekend, but when I get back and fire it up again, I'll experiment with some baffles to see if I can elimate this possibility.
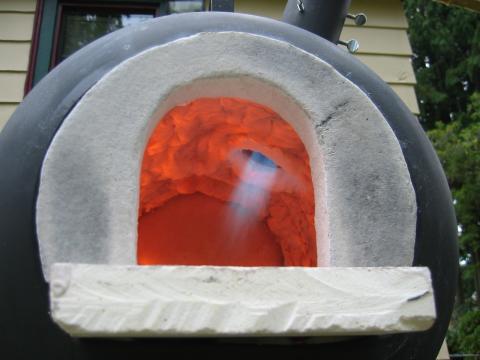
Oct 25, 2004 -- Despite being a bit sick, I finished the curing burns. This forge is done.
I definitely saw exhaust getting sucked into the burner. I heard it too -- the flame gets less stable whenever it happens. Didn't notice much burning outside the forge this time, but it might not be very visible in daylight. Will continue to keep an eye on this. Sure wish I knew what changed.
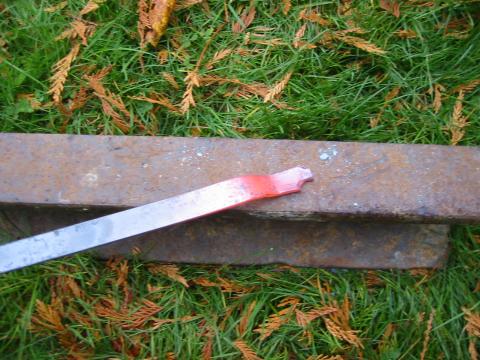
I couldn't resist sticking in the rest of the stock I used for the handle. Used a bit of old rail as a temporary anvil. Found it surprisingly weird to see steel deform so easily.
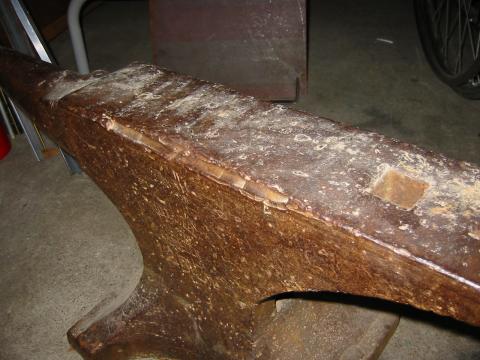
Oct 26, 2004 -- So, this last weekend I finally talked the old family anvil out of my parents. (I haven't bothered to lug it in from the trunk of the car until now, being sick and all.) We're not sure how old it is, or even when it was last used. From the ranching side of my mother's family, it had been sitting around unused for at least 40 years.

It has a very loud ring and hammers leap right off the surface. The markings on the front say:
SOLID STEEL
PARAGON
SWEDEN
125 Lbs
Some web research confirms that this is, indeed, a very nice anvil. The edges are pretty badly abused, unfortunately. You might even say they were gouged.
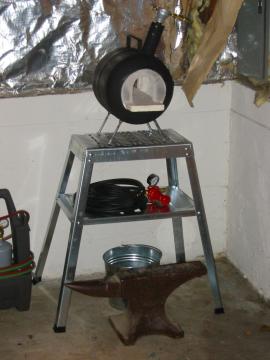
I also bought a nice stand for the forge at Lowe's today. It is the 'Crawford Power Tool Stand' and was discounted to $35. Normally I'd be highly suspicious, but there was one set up there and the construction was fairly solid. I'm still pleased with the purchase after assembling it -- it should hold up well. The forge first nicely on top, though I'll need to bolt some angle stock on for a firmer mount. When I get around to building an idler for the forge, mounting it as well will be easy. And there is even a nice little shelf to stick the hose and regulator on!